
How to Take Professional Underwater Photos With Just Your Smartphone (Android or iPhone)

For decades, underwater photography was reserved exclusively for elite professionals carrying tens of thousands of dollars in specialized equipment. Massive housings, complex external strobes, and heavy DSLR bodies were mandatory to take stunning professional images. Today, that has fundamentally shifted. The rapid evolution of smartphone cameras, combined with the powerful processors found in modern Android and iPhone devices, has changed the game.
You no longer need a crew and a Pelican case full of delicate optics to capture professional-grade gallery pieces; the powerful computer in your pocket is more than capable of nailing professional shots.
However, taking your phone beneath the surface requires much more than simply diving and pressing a button. Here's how to take professional underwater photos with just your smartphone.

Can You Take Your Android Phone Underwater?
Many modern Android phones—including flagship models from Samsung and Google Pixel- are sold with factory water-resistance ratings like IP68. While these ratings protect your device against accidental splashes, rain, or a brief dunk in shallow freshwater, they are not a reliable substitute for a dive-rated housing, and you should never take a bare Android phone diving or snorkeling.
Factory water-resistance ratings are tested in controlled, still freshwater environments. They do not account for the moving currents, physical shocks, or the destructive and corrosive nature of saltwater, which can rapidly corrode internal electronics.
Not to mention that, water resistance degrades over time due to normal wear and tear, and phone manufacturers explicitly state that water damage voids your warranty. Relying on built-in water resistance underwater is generally an extremely bad idea.
The Ultimate Protective Gear: Why Housings Matter
To solve the issue of taking a bare smartphone underwater, you need to put it in a housing. Not only does this protect your phone, but it also significantly improves its performance and lets you access all your buttons easily. Serious underwater creators rely on the premier housing on the market, by ProShotCase.
ProShotCase housings provide complete protection against the harsh realities of the ocean while seamlessly unlocking your phone's potential. These housings feature premium, optical-grade acrylic lenses, which are in sharp contrast to generic plastic pouches that can blur fine details.
Built with impressive depth ratings of up to 130 ft / 40 m and rugged structural durability. They protect your device while integrating seamlessly with their dedicated camera app.
ProShotCases bypasses touchscreen limitations entirely by mapping all primary camera controls directly to your phone's physical volume buttons. This allows Android and iPhone shooters to seamlessly switch between shooting modes, adjust zoom levels, even while wearing thick neoprene diving gloves.
Where Android Differs from iPhones in Taking Pictures
While iPhones are historically known for their cameras, modern Android flagships offer an unparalleled advantage underwater. The cameras on premium Android devices grant users direct, unrestricted access to professional tools such as shutter speed adjustment, manual ISO limits, and true manual focus. Combined with the ProShotCase app, this is a game-changer underwater. Since it allows you to deal with shifting light, suspended particles which can create issues and hamper your efforts.
High-end Android flagships showcase massive, advanced multi-lens cameras. Phones like the Samsung Galaxy Ultra series boast incredibly powerful high-megapixel main sensors, ultra-wide lenses, and advanced telephotos. In contrast, the Google Pixel Pro series uses cutting-edge computational photography and custom sensors that excel in low-light environments. Pairing these phone types with a universal Android housing lets you leverage their power to capture underwater images that rival those from bulky DSLR rigs.
Android-Specific Camera Tips for Flawless Underwater Shots
To squeeze every ounce of performance out of your Android phone underwater, use these specific software and settings configurations:
Shoot in RAW (.DNG) Format
Always enable RAW image capture. Standard JPEG files discard massive amounts of color data to save space. A RAW file preserves the unadulterated data directly from your Samsung or Google Pixel camera sensor. Having a data-rich RAW file lets you effortlessly restore vibrant, true-to-life colors later in post-processing.
Utilize App-Assisted Button Mapping
Because touchscreens are unusable underwater, install a dedicated companion app, such as the ProShotCase app from the Google Play Store. This app remaps your phone's physical volume keys into camera controls. With a click of the physical volume buttons, you can cycle through shooting modes (Photo, Video, Slow-Motion), trigger the shutter, or long-press to smoothly toggle to your ultra-wide-angle lens.
Mastering Composition and Light
While technical mastery is essential for great photos, an exceptional underwater image is defined by composition. The following tips will ensure your composition is on another level.
Rule of Thirds and Negative Space
One of the simplest ways to add emotion, action, and perspective to your images is through using the rule of thirds. Imagine your screen split into a 3×3 grid. Try to position marine creatures off-center at the intersecting points or along the vertical gridlines to create a natural sense of movement. Additionally, utilize negative space (large areas of open water) to draw the eye directly to your subject, giving it room to “breathe” in the frame.
Avoid Shadows and Choose Your Angle
When photographing marine life while snorkeling on the surface, your body can easily cast an unwanted shadow over the scene because subjects are best illuminated when the sun is directly behind you. Always keep an eye out for your shadow.
When framing your image, match your camera angle to the environment:
Shooting Slightly Downward: Ideal for close-up marine life and reef textures, and brings out colors against the darker seabed.
Shooting Upward: Perfect for wide underwater seascapes. Pointing your Android phone slightly upward towards the surface lets you capture dramatic sun rays or create a silhouette of larger marine life or divers.
Learn The Art of Post-Processing RAW Images
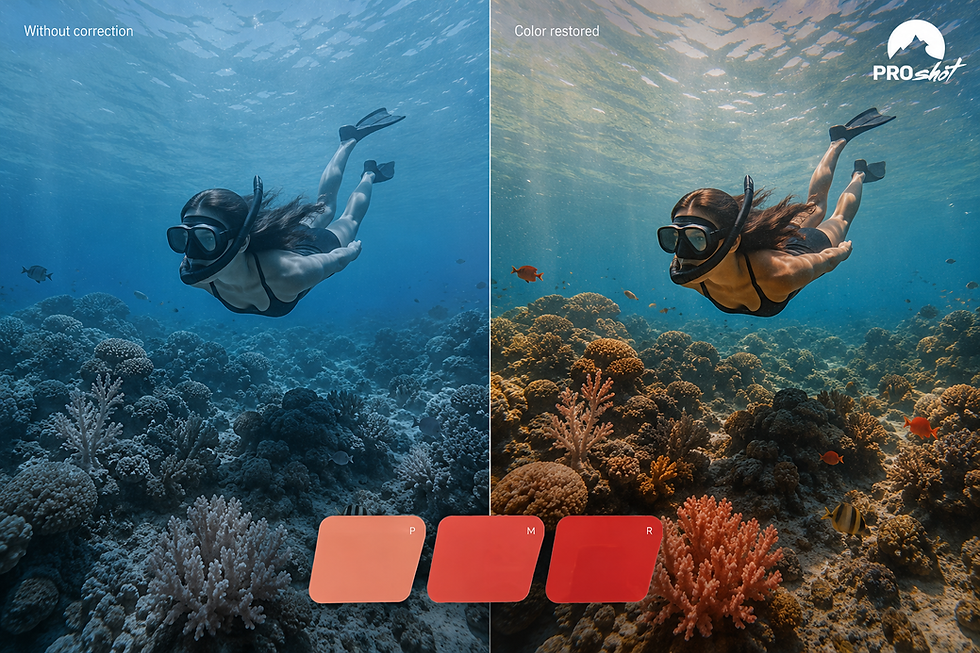
When you first view your unedited RAW files on land, you may be shocked. They can initially look washed out, flat, and intensely muddy. This is a normal consequence of red-light absorption, and it is precisely why you shot in RAW format.
The data required to save the shot is hidden inside the file. To bring them to life, follow a few simple steps.
Add the image to a mobile digital darkroom app, such as Adobe Lightroom Mobile,
Start by fixing the lighting values. Boosting Contrast, Highlights, and Shadows.
Fix the color balance using the temperature sliders. Warmer means adding more yellow, and the tint lets you add more reds.
Next, fix your HSL settings (Hue, Saturation, Luminance).
Finally, fix any annoying particles and fog using the Dehaze and Clarity Sliders.
With some practice, you will turn regular photos into truly stunning professional images.
Final Thoughts
You can argue that a new era of mobile underwater photography has arrived. Armed with an iPhone or an Android device, a high-performance ProShotCase housing, and a solid understanding of the underwater environment, you can now take stunning images that could only be achieved by a professional a few years ago. With that in mind, there is no reason not to grab your gear and jump in the water.


If you need a browser game that loads fast, Drive Mad is a fun choice. I like how each level feels a little different from the last https://drivemadgame.cc